Disclosure: As an Amazon Associate, I earn from qualifying purchases. This post contains affiliate links, meaning I may earn a small commission if you buy through them. I only share products our family has used or genuinely believes would be helpful. Thank you for supporting NDHS Life!
How an American Girl Doll Inspired a Hands-On Homeschool Project
Old Presents Bring New Ideas
Last Christmas, my daughter was gifted my old American Girl doll, Josefina. She was so excited and has absolutely loved dressing her up, playing with her, and being her “mom.”
Lately, my daughter had been asking for a home for Josefina to live in. When we started looking online, most houses designed for 18-inch dolls were either five feet tall or cost anywhere from $200 to $1,500. None of the options seemed quite right for us.
So, naturally, we decided to make one ourselves.
And what started as a DIY American Girl dollhouse quickly turned into an unexpectedly great homeschool STEM project.
The ADHD Urge to Tackle a Project
As a mom with ADHD, when my daughter has an idea, my ADHD brain immediately wants to figure out how we can make it happen—preferably as creatively as possible.
I already knew our three biggest constraints:
- Josefina needed to be able to stand up inside.
- The house needed to be relatively small.
- It definitely couldn’t cost hundreds of dollars.
I knew we had our work cut out for us, but I also knew this could become a great hands-on learning experience for both of us.
Turning Our Idea Into a Homeschool STEM Project
Our DIY American Girl dollhouse naturally incorporated multiple STEM concepts throughout the different phases of the project.
We weren’t sitting down with a worksheet about measurement or engineering. We had a real problem to solve, and my daughter had a reason to care about the answer.
That made the learning feel much more natural.
Research Phase
The first thing my daughter and I did was research.
We scoured Google Images for inspiration, looking at different DIY American Girl dollhouse ideas, room layouts, furniture arrangements, and dimensions.
There were so many creative variations, but none of them quite met my daughter’s design preferences or fit within our constraints.
That meant we had to keep looking.
Not Quitting When We Had No Luck
When nothing we found was quite right, we started thinking outside the box.
Instead of looking only at dollhouses, we began researching IKEA cabinets, bookshelves, wardrobes, and other pieces of furniture that could potentially be converted into a dollhouse.
Now we weren’t just thinking about what the house should look like. We had to think about dimensions, available space, materials, and functionality.
My daughter got hands-on experience measuring a real object and working with an actual design requirement: her doll was 18 inches tall.
If Josefina was going to comfortably stand inside her new home, we wanted the interior to be at least 20 inches high.
Eventually, we realized that an MDF bookshelf with adjustable shelf heights gave us the best combination of size, flexibility, and price.
This was our first real lesson in engineering design: identify the problem, establish requirements and constraints, and find a solution that works within them.
Moving Into the Design Phase
We finally decided on a bookshelf (paid link) and ordered it, along with some adhesive shelf liner. There were so many options to choose from, and it’s so easy to swap out patterns (paid link).
We knew we wanted to customize the space, but we also wanted the flexibility to change the design later without permanently damaging the furniture.
The adhesive shelf liner gave us a way to decorate the walls and floors without making permanent changes to the bookshelf.
At this point, my daughter wasn’t simply choosing decorations. She was thinking about how she wanted the available space to function.
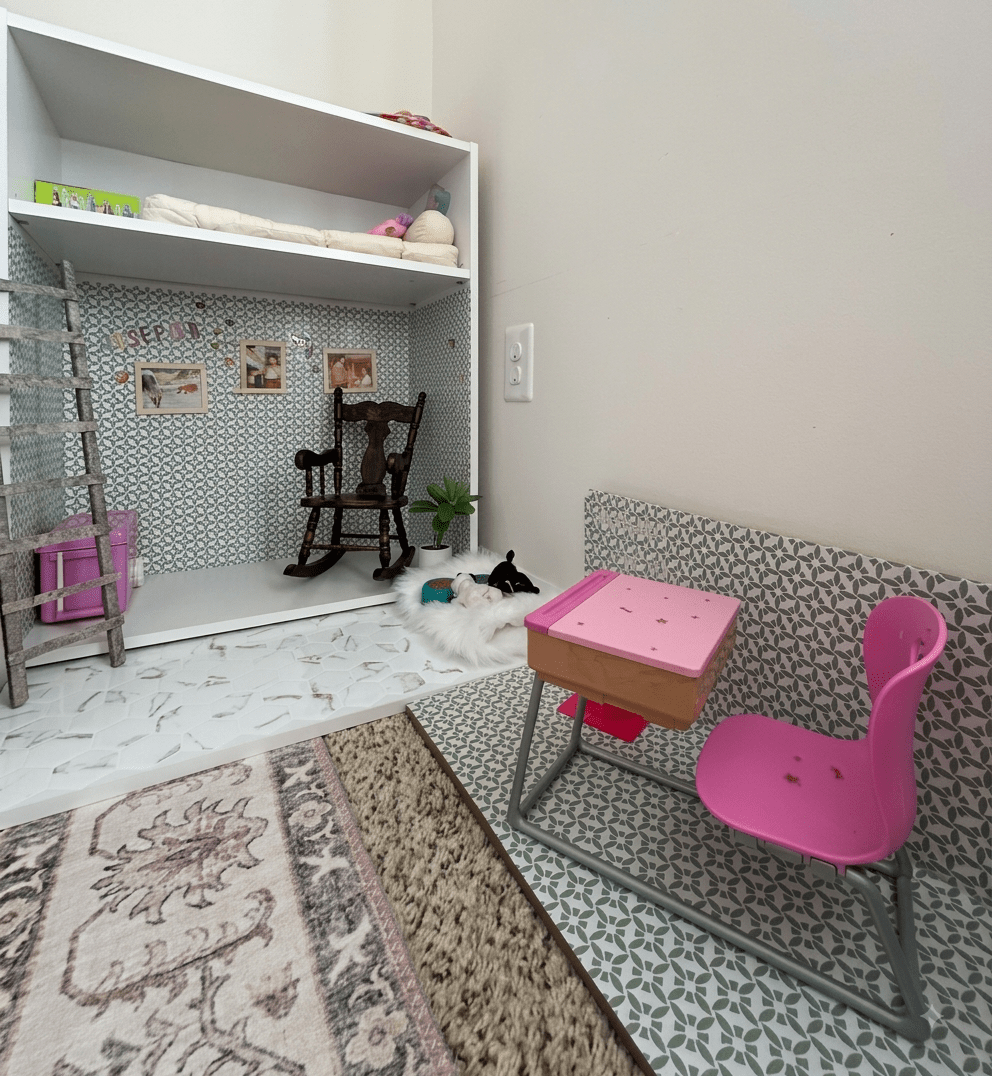
We decided on a living room, a loft bedroom, an outdoor patio, a rooftop patio, and a separate homeschool room for Josefina.
If Josefina was going to be homeschooled, she needed her own homeschool space, too.
Installation and Building Phase
Once the bookshelf arrived, my daughter got hands-on experience assembling furniture and following step-by-step instructions.
After it was assembled, she checked her measurements again to make sure her original calculations were correct and that Josefina could actually stand inside the space.
And thankfully, she could!
We also had an extra shelf that we weren’t going to use in the bookcase. Rather than waste it, we turned it into an extension of the dollhouse by placing it on the floor and calling it a patio.
This was another little lesson in creative problem-solving and working with available materials.
After we covered the walls and started setting up the different spaces, we added letter stickers with Josefina’s name and printed photos of her doll family.
We even found some spare wood in the garage and used that, along with popsicle sticks and leftover wallpaper, to create a ladder leading up to her loft bedroom.
Instead of buying everything new, we looked at what we already had and figured out how we could repurpose it.
how building a diy dollhouse tied into stem
It really is just a bookshelf turned into a dollhouse. We didn’t build the bookshelf ourselves, and we didn’t use fancy tools or create elaborate plans. We found a piece of furniture that fit our needs and figured out how to turn it into something my daughter wanted.
But that’s exactly what made it such a fun homeschool project. She measured, made decisions, followed assembly instructions, thought about how to use the available space, helped build the loft, and figured out how we could repurpose materials we already had.
The STEM wasn’t the bookshelf. The STEM was in the thinking we did around it.
Looking back at the project, my daughter practiced:
- Measurement: Measuring the doll and the available space to establish design requirements.
- Geometry and spatial reasoning: Thinking about how furniture and rooms would fit within a limited three-dimensional space.
- Engineering design: Working within constraints and adjusting the design to solve a real problem.
- Problem-solving: Finding alternatives when our original ideas didn’t work.
And perhaps most importantly, she got to experience something that can be difficult to recreate with traditional schoolwork:
She had a problem she genuinely wanted to solve.
Building Skills and Memories
To be honest, I don’t know who enjoyed this project more—me or my daughter.
My daughter got hands-on STEM experience by measuring real objects, establishing design requirements, working within physical constraints, designing multiple functional spaces, and thinking about how those spaces related to one another.
But she also learned something that doesn’t show up quite as neatly on a worksheet: her ideas can become real things. She had an idea, researched, measured, designed and built it. We also worked on our flexibility when things didn’t go to plan.
In the end, Josefina had a home, and my daughter was so happy with all she had done.
For me, the best part wasn’t whether our dollhouse qualified as a “real” STEM project.
It was watching my daughter’s imagination turn into something she could actually touch, use, and be proud of.
And honestly?
I felt like a kid again, too. And now my daughter is planning all of the new furniture she thinks she needs for Josefina’s house, and is convinced Josefina needs a sibling (paid link).
 Neurodivergent Homeschool Life
Leave a comment